Thursday, October 31, 2013

Witchy-poo!

All Hallows Eve is upon us! I still haven't bought candy - oh the horror!!

I mentioned in my last post about the Halloween Tea that I hosted this last weekend, well what would a Halloween tea be without a witch? Since I was hosting, I had to have a little something witchy, so I tszujed myself up a hat! 


Ooooh! Ahhh!
Really, this was a very simple fix-up. I started with a "deluxe" witches hat that I purchased at Halloween store, then I ripped a bunch of stuff off of it, and added my own.

Flowers & rhinestones naturally, because I'm a fancy witch!


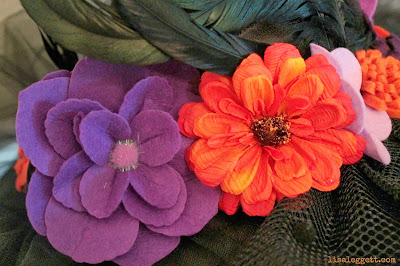
I added the rhinestone swirls (seriously easy, literally peel & stick!) and I made a handful of my favorite kinds of felt flowers to add to the brim. 


I didn't make the two flowers below, but they were my inspiration for color and pretty to boot, so I added them as well.


The hat fits great and really stays on, the flowers add just enough weight around the crown of  my head so that the hat doesn't feel flimsy, or like it will blow off in the slightest breeze.


Now... where and how am I supposed to store this the rest of the year?? I didn't think of that when I was constructing a 2 foot tall hat :/

Want to see a picture of me in the hat?


How about another?
.
.
.
.
.
BOO!
 Now *THAT'S* scary!

Happy Halloween, e'ryone!
Have fun ~ be safe!
oxo,
Lisa

p.s. There are a few other fun little Halloween things that I've made this year, but didn't have a chance to post about, be sure to pop over to my Flickr account, I'll at them there.

p.p.s. I really want to wear this hat every day, would that be weird?

Wednesday, October 30, 2013

Bats Flapping At My Door

Greetings!
The witching hour is nye! Are you ready for little ghosts an goblins to ascend your stoop? I'm mostly ready, all I need is the candy, I don't like to have those delectable little goodies around the house too early or I end up indulging too much.

So! I made a new Halloween wreath for the front door this year, inspired by a combination of something I saw on Pinterest, and the urge to try one of those cool yarn wrapped wreathes. Only thing was that I didn't care to purchase a wreath form from the craft store, those babies are expensive. Instead I attempted, to no avail, to find a pool noodle, alas, I could not find one in mid-October. What to do, what to do? How about a trip to the Home Depot? Success... sort of. More on that later, let's focus on the cute for now!

Batty Halloween Wreath by Lisa Leggett

A harvest moon, a dead tree in the night...

Batty Halloween Wreath by Lisa Leggett

A very large, very sparkly bat!

Batty Halloween Wreath by Lisa Leggett

A bit of hot glue, and shazam, Halloween wreath!

Batty Halloween Wreath by Lisa Leggett

Ok, so there's a bit of a problem here... what I ended up using to form the wreath is pipe insulation. You know, that black, pool noodle looking stuff that you cut to fit and wrap around your hose bibs in winter? Well, the trouble is is that it's a bit flimsier than a pool noodle and after I had the whole form wrapped completely in my yarn, it started creasing at the top because it wasn't strong enough to keep it's circle shape, see how it's a little bit egg shaped at the top? Bummer.

Still, all in all, I'm mostly happy with this wreath, especially where the cost is concerned. I think the total was less than $7, not too shabby. I think eventually I will remake this wreath because I like the concept, but it's just not stable enough for my complete satisfaction. Ah well, you win some, you lose some and I think it's just as important that we show the things we make that aren't quite so perfect so that we can all learn what *not* to do, right?

Have any of you made a Halloween wreath? I'd love to see it if it's online somewhere, just point me to it in the comments.

oxo,
Lisa

Monday, October 28, 2013

All Treats, No Tricks

Hello-hello!
Today I wanted to share with you what June of I Sew Cute sent me in our Weekend Trick or Treat Swap.

 Let's open the box and see what's in there!

Oooh, candy!

June sent me one of her fab jewelry pieces, she's a whiz with the resin! She makes the cutest stuff, you've got to check our her Etsy store. This one is my most favorite!
Pumpkin Resin Necklace by I Sew Cute

She also painted me the most darling haunted teapot notebook. I've never seen anything like it, and I think it's just as charming as all get out! 
Pumpkin Resin Necklace and Haunted Tea Pot Notebook by I Sew Cute

And socks! I love Halloween socks, I have a bunch of them but none like this, love em.

And then...

And then I opened this!

Eeeep! Look at this cute little owlet! 
Sweet Halloween Owlet by I Sew Cute

Oh, he's the cutest lil owlet ever, just look at those big eyes! He's soft and snugly and he needs a hug!
Sweet Halloween Owlet by I Sew Cute

I'mma go hug my baby owlet! Go check out June's awesome jewelry, ooh, or her Pinterest boards, she pins awesome stuff! Fun fact, I was already following her when we were paired up as partners for this swap! It was great, I felt like I already knew her a little bit.

The Halloween Tea party yesterday was a smash! But of course I only managed a few photos before everyone got here, that's always the way it goes, darn it. Once the party gets going, and I get busy making tea and chatting, I completely forget about photo taking... Anyway, here's a couple of shots of the table before everyone arrived.

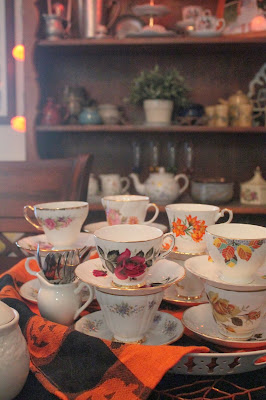
I have a lot of teacups so for this party, I chose about a dozen of my prettiest fall-ish colored ones; oranges and yellows. Browns and dusty mauve's and golds. I love that pallet.
Fall colored, china teacups for Halloween Tea Party

This is a quick shot of the table with most of the goodies laid out. So many goodies...

Psst... if you look carefully in the upper left hand corner you can see a peek at the witches hat I made to wear for the tea party (which it ended up being too darn hot to wear, boo.), more on that later!

Hope your week is off to a great start!
oxo,
Lisa

Friday, October 25, 2013

Trick or Treat!

Hello Ghoulies!
We're creeping ever more closely towards Halloweeeeeen, mwuah-ha-ha-ha-haaaa! Are you as excited as I am? I'm hosting a Halloween tea at my house this weekend, so I'm excited! I'll definitely try to get some pictures.

In the meantime I thought I'd share what I made for my partner in the other Halloween swap I participated in this year on Craftster, this was called the Weekend Trick or Treat Swap, and it was a mad dash! We were assigned our partners on a Thursday and had to send out the following Monday - craftapalooza!

Sparkly Pumpkin Bucket for storing suprises!

My partner was the super fun lady behind I Sew Cute, who's name is June. Here's what I made for her. 

June mentioned to me that a treat or something for her two adorable kiddo's would be something she'd enjoy - what a good mommy! So I made a couple of stuffed "poppers". 

Goodies for the Halloween Poppers

 I gathered up some Halloween goodies, small things like plastic skelly's, stickers, buttons, erasers and zombie finger notepads, along with some suckers. I jammed them into empty TP rolls and stuffed the ends with shredded paper.

Stuff empty TP rolls with little goodies, stopper the ends with shredded paper, and roll up in wrapping paper for a fun little surprise.

 I rolled them up in polka dot wrapping paper and hot glued a squishy little pumpkin to the top of each.

Halloween Popper by Lisa Leggett

Lastly, I used a couple of images from an old Mary Engelbreit  day-by-day calendar to add a bit of cuteness and a name tag for each of the kiddo's. These were really easy & fun to put together, I'm thinking of trying to make a couple more of them for the kids attending the Halloween Tea on Sunday.

Personalized Halloween Popper by Lisa Leggett

For June I made a couple of grown up goodies, like this Halloween themed, felt & embroidered broach with a beaded edge.
Beads, felt & embroidery for a sweet little Halloween Pin by Lisa Leggett

I learned a new stitch for this one, it's called the Beaded Picot Stitch. My dear pal, Paulette is a master at this stitch and we were chatting about it recently, she sweetly sent me step-by-step instructions and I had to put them to use straight away, thanks P!!!.
Beaded Picot Stitch

This is the pin when I thought it was done, but I was unsatisfied with it, it was missing something... more beads & stitching!!
Unfinished Halloween pin, before I added some sparkle.

I added little beaded eyes and a small scattering of "stars". For the moon, I used DMC glow-in-the-dark floss and covered it entireley in big, uneven (on purpose) stem stitches, I wanted it to look almost like brush strokes (think Van Gogh), pretty cute, aye?

Little Batty Broach by Lisa Leggett

Speaking of the moon... 
The other thing I made for my partner is this little coffin... it holds a secret!

Halloween Moon Curio Coffin by Lisa Leggett

The moon, the magical moon!

Wreath detail with silver moon bead

It's a tiny curio!

Halloween Moon Curio Coffin by Lisa Leggett

I'll let the pictures to the talkin'.

Halloween Moon Curio Coffin by Lisa Leggett

Halloween Moon Curio Coffin by Lisa Leggett

Halloween Moon Curio Coffin by Lisa Leggett

Halloween Moon Curio Coffin by Lisa Leggett

Halloween Moon Curio Coffin by Lisa Leggett

A lot of steps involved in this piece special paint techniques, decoupage, various trims, Fimo sculpting,  and even a little bit of poetry, all worth it! My partner thought it was magical! Aww, thanks June!

It's funny, I made this little curio so fast and sent it out as soon as it was finished, now looking back a couple of weeks after the fact, I love it, too! I wasn't so sure at the time because I just don't have a lot of experience in this type of craft. Apart from the vintage inspired keepsake box I made for the other Halloween swap I participated in recently, I've never made anything else remotely like this, and didn't really know what I was doing, so I went with the "too much is never enough" theory and just kept adding layers and layers until almost ever surface was covered. *nervous laugh*  It all worked out in the end :)

I also sent June a little Barbie. Because really, when was the last time someone gave YOU a Barbie? And she was cute, her dress has candy corn on it!
Halloween Barbie

So here are all the goodies ready to fly away to my partner, lol, Booger candy!!
Trick or Treat Swap package by Lisa Leggett

Trick or Treat pail, stuffed with goodies, ready to go!

This was a really neat swap, I liked the quick factor, very like trick or treating!
Next, I'm going to show you what June made for me, it's so great!!

Wishing you a happy, haunty Friday!
oxo,
Lisa

p.s. I know there are a lot of details in this post, if you have any q's, hit me in the comments, I'd be happy to answer any you might have

Tuesday, October 22, 2013

No Time Like The Present

We now interrupt your regularly scheduled Halloween post for something a bit different. 

I had a birthday recently, well... not that recently (mid August). 39. 
39? Is that possible? Who sped up the clock?

Anyway this week was a banner week for receiving birthday goodies in the mail from a couple of my crafty pals, and as you probably know, when you have friends who are also crafters and who make all their pressies, time doesn't always go as according to plan. And I am perfectly ok with that! Time, as you know is wibble wobbly, timey wimey... stuff. *wink*  

Allons-y!

Fox Award Ribbon by Tara Fields
The fabulous Mistress T made me this stellar, foxy ribbon. That means I win at being a fox! 
Woooo!

Fox Award Ribbon by Tara Fields
Look at that cute little foxy face! 

Also fabulous & feisty, my pal Pam stitched me this adorable birthday cake! Pam's stitches are legend, they're tiny and they are perfect. Perfectly awesome!
Embroidered Happy Birthday Cake by Pam Pedersen
I think she must have harnessed her super telepathic powers because this looks almost exactly like the actual cake my husband had made for me for a little surprise party he threw for me. 

Embroidery inspired birthday cake
It's an embroidery cake! The yellow ring is the hoop and the white frosting (omg, the frosting! SO good. Light as a feather whipped cream, my favorite!) is the fabric hanging down with stitching on the top, adorbs!

 My dear, dear friend Melissa harnessed a different power, the power of my dreams! She stitched me the sweetest little camp trailer, with a purple bunting! 
Stitched Camp Trailer by Melissa Loken
I have ambitions to buy one of these in the coming year, a real one! I even started a Pinterest board with a few little things. I've wanted one for as long as I can remember. I love, love, love tent camping, and I think I always will - but uh... it's a lot of work. There's something about just hooking up and hitting the road that really appeals to me. When the time comes, you know I'll share that adventure with you.

Melissa also stitched me this sweet Leo, isn't she cute?!
Leo Zodiac felty by Melissa Loken
Love her ever so!

Speaking of Leo's, I picked myself up a little Leo lady this year, too.
Leo Loopsy
Yes, I am a grown up. What. 
Lalaloopsy is too cute to resist, look at her crown purse, and her little mousy friend, eep! I have a few of them, more on that in an upcoming Halloween post!

I am blessed with awesome buddies.
Birthday goodies! By (clockwise) Pam Pedersen, Melissa Loken and Tara Fields
Thank you girls! All of these goodies have happy new homes, hanging in my craft room, I love them almost as much as I love you guys!

Halloween posts to resume shortly!!
oxo,
Lisa

Thursday, October 17, 2013

More Vintage Halloween Goodness!

Hi All!
Weren't Nixiebum's goodies terrific? I felt pretty spoiled when I opened that package, and since this was my first Craftster swap, I wanted to spoil my partner, too. Here are the goodies I made for her.

Vintage Halloween Swap Items by Lisa Leggett

First up, a little pumpkin pincushion and some Halloween straight pins.
Pumpkin pincushion with handmade Halloween pins.
I sculpted the three pins, the witch hat, the bat and the tiny pumpkin out of Fimo, I haven't used that stuff in eons! It was fun to play with that material again, and now I'm on a kick wanting to make several other things with it! The pumpkin pincushion came out pretty darned cute, especially since it was conceived to be a Halloween inspired hot air balloon...
Failed Felt! Supposed to be a hot air balloon.
Yeah, no.

All righty then, moving on!

Check it out, I got crafty with paint and Mod Podge! This vintage inspired keepsake box was the plain, brown, paper mache variety you can get at most craft stores, I changed it up a bit starting with a coat of black spray paint all over as a base coat, then a coat of acryllic black, then crackle coat, then a coat of a sort of creamy white that I blended myself. Mostly white with a couple of drops of a two other browns. This was the first time I've ever used crackle coat (I know, super late to that party) and I thought it was magical! Now I want to crackle everything!
Vintage Insprired Halloween Keepsake Box

Next I layered these cutie pie vintage Halloween girls over some scrapbook paper that looks just like handwriting. Mod Podge is awesome, I will never bemoan it's price again. I trimmed out the papers with sparkly, silver pipe cleaners and a few rhinestones. 
Vintage Insprired Halloween Keepsake Box

I'm not sure if it was because of the layers of moisture (several layers of paint & Mod Podge), but after all of those layers were applied, the box didn't stay closed, so I added a simple elastic-over-button closure so the box would stay closed by drilling tiny holes and using one of these cute fabric brads I bought a some time ago from Stampin Up. Worked like a charm!
Vintage Insprired Halloween Keepsake Box - button closure
I also glittered the bottom, inner ledge of the box, yay glitter!

The inside of the box got the full treatment, too. More paint, scrap booking paper & Mod Podge, woo! 
Interior of Vintage inspired Halloween Keepsake box.

A couple little vintage looking Halloween ornaments were quick and fun to put together. I could make these all day.
Pipe cleaner Halloween ornaments

BOO!
Boo Bunting!
You know I had to make a bunting, I have a thing for buntings. These cool letters came off the bottom of a fabric panel that I'm using for another project, they started out like this, in case you're interested in making one yourself. I trimmed the top of the bunting with polka dot ribbon and added some large, felt flowers to inbetween each with some stripey ribbon, too. Then I blinged out the bottom corners of the individual flags with buttons, rhinestones and tiny felt flowers and trimmed the very bottom of the bunting with black pompom trim. I'm really happy with the way this lil bunting came out. 

Every trick-or-treater needs a new candy bag! I made this one out of some pretty, Halloween fabric, the very essence of "Vintage" Halloween, me thinks.
Vintage Halloween fabric, simple drawstring bag for trick-or-treating
A simple drawstring bag, start to finish - 15 minutes! I used the same polka dot ribbon for the handle as I used on the top of the bunting. 

Lastly, I made this little kitty sweetheart!
 Handmade vintage inspired Halloween Kitty figurine
I sculpted her head & ears from Fimo and painted her tiny little face the next day after it had plenty of time to cool. That was hard, I don't think I'm a very good painter as far as itsy bitsy details go. Her body is made from fluffy pipe cleaners and she's perched atop one of my stash of antique thread spools that I trimmed out with pompom and that same polka dot ribbon.

She looks like she's leading a Halloween parade, doesn't she? Her baton is actually a toothpick that I painted white & black and added another of the teensy pumpkins I sculpted from Fimo to the top, and an an orange wooden bead to the bottom. Oh, and I added a tiny bit of purple, metallic DMC up under the pumpkin for extra pizazz. A small felt flower and purple rhinestone on her lil ear make her a fancy kitty.
Halloween Kitty face & baton details

Her shirt is another pipe cleaner wrapped around the main portion of her torso, and her skirt is a bit of ribbon that I gathered with a running stitch until it looked about right, simple & cute!
Halloween Kitty skirt detail
I think she might be my favorite thing that I made for this swap, I've never made anything like her before. Fun stuff!

So here again is my entire package for Nixiebum, I like to think it has a theme and is cohesive, I can get a bit obsessive about things, can you tell? *wink*
Vintage Halloween Swap Items by Lisa Leggett

Anyway, like I said this was my first Craftster swap and I was tickled to pieces with the whole process, the moderators were great and communication with my partner was excellent which made the whole process a lot easier. I still found the high level of craft a bit intimidating truth be told, the folks involved in this swap make some incredibly detailed, imaginative and amazing items! If you'd like to see the picture gallery of the items from this swap, click here. I still get major swap anxiety (which I think is pretty common) every time I send out something I've made, will they like it? Did I hit the mark, etc, etc. But my Nixie liked everything, and I'm so happy that she did. Swapping is good, keeps you on your toes - keeps your skills sharp!

Once wasn't enough, and I love Halloween, so I joined another swap after this one! Once again I was blessed with an awesome partner and I can't wait to show you what she made for me! I've got a whole bunch of Halloween posts lined up, so stay tuned, folks!

I hope you've enjoyed this little peak into what I've been up to, do you have a favorite? I'm still crushing on the Halloween Kitty. ♥

oxo,
Lisa